Building an example
The following section shows how to build a simple example program in VS Code.
This example will print a message on the console and flash an LED on the XK-EVK-XU316 board. On other boards with the xcore.ai device it will print the message on the console but the LEDs may not flash.
It uses the XMOS build system. See the Hello World Example for details on the file structure and content required to describe and build a project.
When following through the steps below, some dialogs may pop up. For example the VS Code CMake Tools extension may ask whether an XCommon CMake project should be re-configured each time VS Code is started. Certain dialogs may be ignored and they will disappear after a few seconds. Depending on the responses provided these dialogs may pop up again later - for example when a workspace is opened in VS Code a second time.
Copy the example
Browse to the installation directory of the XTC Tools, for example
C:\Program Files\XMOS\XTC\15.3.1\Browse to
examplesCopy the sub-directory
ExampleXCommonCMaketo a temporary working directory
Starting VS Code
Open an XTC Tools Command Prompt
Change directory to the copied
ExampleXCommonCMakedirectoryIn the command prompt type
$ code .
Note the
.character which tells VS Code to use the current directory as a workspaceNote: If VS Code restarts (for example after a machine reboot) it may not inherit the XTC Tools setup carried out above. If this occurs, close VS Code, and go back to Starting VS Code
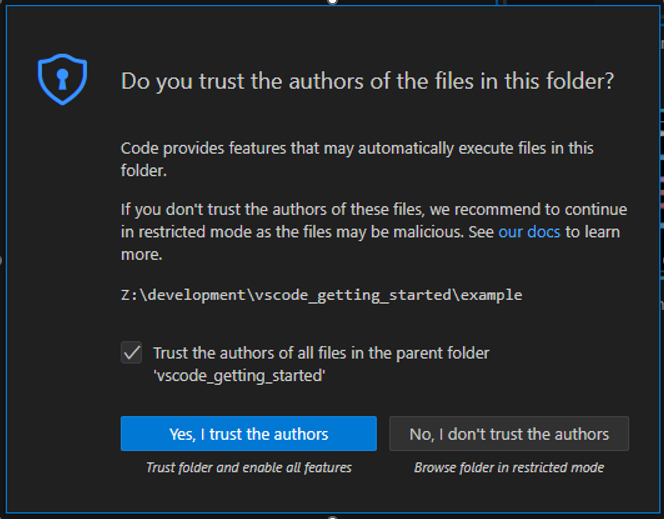
VS Code may present a dialog box Do you trust the authors of the files in this folder. Check the box Trust the authors of all files in the parent folder … and press the button Yes, I trust the authors
Ensure all instances of VSCode are closed in the Dock - this is required to ensure that when it is opened in the steps below it inherits the XTC Tools environment
Use a shell in which the XTC Tools have been setup for command line usage
Change directory to the copied
ExampleXCommonCMakedirectoryType
$ open /Applications/Visual\ Studio\ Code.app
Note 1: VS Code may open a workspace directory which had been used in a previous session. If this occurs, close the workspace directory with File => Close Folder and open the copied
ExampleXCommonCMakedirectory with File => Open Folder…Note 2: If VS Code restarts (for example after a machine reboot) it may not inherit the XTC Tools setup carried out above. If this occurs, close VS Code, and go back to starting VS Code
VS Code may present a dialog box Do you trust the authors of the files in this folder. Check the box Trust the authors of all files in the parent folder … and press the button Yes, I trust the authors

Use a shell in which the XTC Tools have been setup for command line usage
Change directory to the copied
ExampleXCommonCMakedirectoryIn the command prompt type
$ code .
Note the
.character which tells VS Code to use the current directory as a workspaceNote: If VS Code restarts (for example after a machine reboot) it may not inherit the XTC Tools setup carried out above. If this occurs, close VS Code, and go back to starting VS Code
VS Code may present a dialog box Do you trust the authors of the files in this folder. Check the box Trust the authors of all files in the parent folder … and press the button Yes, I trust the authors

Setup VS Code to use XCommon CMake
VS Code can be be extended by installing Extensions from the Marketplace. Extensions are provided by Microsoft and by third parties. Both Microsoft and third party extensions are used to use the XTC Tools with VS Code.
Install the CMake Tools extension
In the copied example directory ensure there is a subdirectory called
.vscodeand it has a filesettings.json, which contains{ "cmake.generator": "Unix Makefiles" }
Note 1: All XCommon CMake based projects require a
.vscodesubdirectory with a filesettings.json, with the above contentNote 2: VS Code may write additional lines into this file. It may be necessary to delete these lines, particularly if the
.vscodedirectory is copied into a new workspaceNote 3: The file explorer or command line tools on some systems may default to hide directories which start with a
.character. There is normally a way to make these directories visibleSelect the Extensions icon on the left-hand Activity bar as shown below

Type
cmake toolsinto the Search Extensions in Marketplace edit boxFrom the list of extensions presented, selected CMake Tools provided by Microsoft
Press the Install button in this extension
If a pop-up prompt appears over the VS Code top-centre search box with a list box titled: Select a Kit for ….
Click on the [unspecified] option in this list box
If this pop-up prompt does not appear or it disappears before a kit has been selected
Go to the CMAKE View in the Primary Sidebar
Select the CMake icon on the left hand side bar
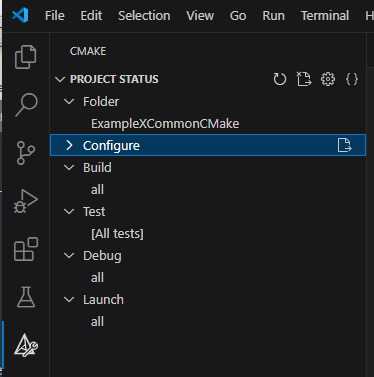
Expand the Configure item, and click on [No Kit Selected]
Click on the pen icon. This is shown below
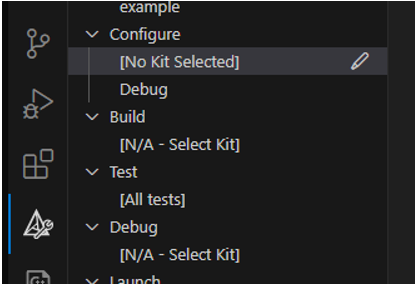
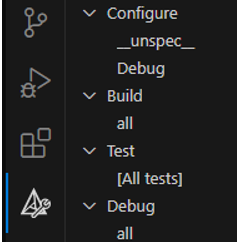
This will make a pull-down menu appear – select [Unspecified] and then the Configure pulldown will show __unspec__ as shown below
Install the Task Runner extension
Select the Extensions icon on the left-hand Activity bar
Type
Task Runnerinto the Search Extensions in Marketplace edit boxSelect the extension Task Runner by Sana Ajani and press the Install button
VS Code is now set up for use with the XTC Tools. The Setup instructions above should not need to be repeated each time VS Code is started using the steps under starting VS Code
Configure the example
An XCommon CMake project must be configured before it can be built. This will generate subdirectories which are used in the subsequent build phase.
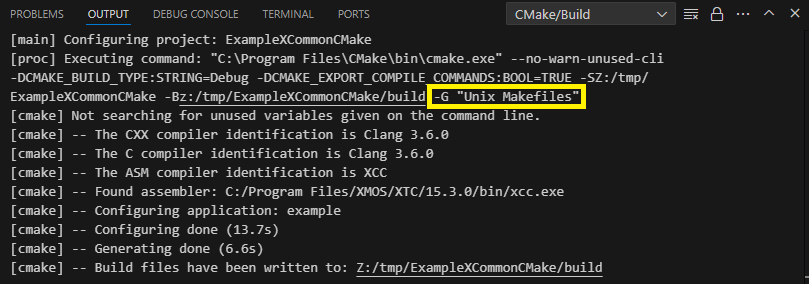
The Configure step may be performed automatically by VS Code at this point and the OUTPUT window in the Panel will show
If this configure step has not been done, it may be launched by selecting the CMake icon in the Activity bar and clicking on the page icon to the right of the Configure pull-down
Ensure the OUTPUT Window shows the
-G Unix Makefilesoption tocmakeas shown in the figure above. And that the compiler identification reports:The CXX compiler identification is Clang 3.6.0. This is the underlying compiler tool used by the XTC ToolsNote: If a Configure step is made a second time, reduced text is shown in the OUTPUT Window. The line with
-G Unix Makefileswill be shown, but subsequent lines will not. To perform a full “Configure”, delete the generatedbuilddirectory from the top level of the project and repeat the Configure stepWait for the Configuring project: … progress message in the bottom Status bar to disappear. A message of the form
[cmake] -- Build files have been written to:...will be shown in the OUTPUT WindowA
builddirectory will be created in the workspace directory containing the required files for the subsequent build stepNote: This build directory may need to be deleted manually if the workspace directory is copied or moved, and the Configure step repeated
Build the example
This will build the target binary files using the configuration generated in the above steps.
Select the CMake icon on the left-hand Activity bar
Build the configured example by pressing the Build icon to the right of the Build pulldown

The OUTPUT window will show

Running the example
Connect a single XK-EVK-XU316 target board to the host computer using two USB A to micro-B cables.
The example will be run using a VS Code Task
Ensure the .vscode subdirectory contains the file tasks.json with the content
{
    "tasks": [
        {
            "label": "Run example.xe",
            "command": "xrun",
            "args": [
                "--io",
                "${workspaceFolder}/bin/example.xe"
            ],
            "options": {
                "cwd": "${workspaceFolder}"
            },
            "problemMatcher": []
        },
        {
            "label": "Flash example.xe",
            "command": "xflash",
            "args": [
                "${workspaceFolder}/bin/example.xe"
            ],
            "options": {
                "cwd": "${workspaceFolder}"
            },
            "problemMatcher": []
        }
    ]
}
Select the Explorer icon on the left-hand Activity bar
Expand the TASK RUNNER drop-down at the bottom of the Primary Side Bar
Select Run example.xe

The output from the run is shown in the TERMINAL window in the Panel. The text
Hello World!will be shown and the LEDs will flash. This program will run until it is terminated by the user.
If the task runs forever (typically when xrun is launched with –io, and the target program never terminates), a spinning symbol will be shown next to the running task info button.
It may be terminated by pressing
Ctrl-Cin the TERMINAL window or by terminating the TERMINAL in which it is running by clicking on the trash-can icon to the right of the task info button.Note: On some systems, when using the trash-can icon, the LEDs may continue to flash due to the way VS Code terminates the xrun process
Flashing the example
Select the Explorer icon on the left-hand Activity bar
Expand the TASK RUNNER drop-down at the bottom of the Primary Side Bar
Select Flash example.xe

Flash progress is shown in the TERMINAL window in the Panel
Using the TERMINAL
The TERMINAL in the Panel may be used to run commands interactively.
For example xflash or xgdb may be launched from the TERMINAL.