Installation instructions#
Download the XTC Tools#
The tools and related drivers are provided in a single platform-specific downloadable file. By default, the file will be available from:
https://www.xmos.com/software-tools
Click on the host operating system to download the installer file.
Install the XTC Tools#
To install the tools on your host system, follow these steps:
Run the downloaded installer file (for example tools-15-microsoft-15-3-0.exe) The installer graphical interface will guide you through the installation
Click “Yes” when asked to allow the installer to make changes to your computer
For a default installation, click “Next” on every page, then “Install”
Uncompress the archive to your chosen installation directory. The example below will install to your home directory:
$ tar -xf tools-15-linux-15-3-0.tgz -C ~
In this example, the tools will install to
~/XMOS/XTC/version. This location will henceforth be known as your tools installation location.
Double-click the downloaded installer to open it, and then drag the ‘X’ icon into your Applications folder.
Unmount the installer.
Check your installation#
After installation, check it by following the instructions at Configuring the command-line environment.
Configure the xTAG USB drivers#
The tools interface to target boards over USB via an xTAG adapter. Some target boards require an external xTAG adapter that connects to the board via an xSYS or xSYS2 connector. Some target boards include an integrated xTAG adaptor.
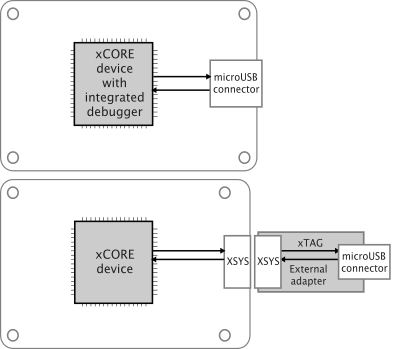
Fig. 1 xTAG adapter configurations used with xCORE target boards#
The xTAG drivers are normally installed by the XTC Tools installer. Connect the target system to the host system after an installation to activate the drivers.
The xTAG drivers for Linux are installed as part of the normal installation
process. However, to make them accessible by all users, an additional step
requiring root access is needed. This step is likely only required once on a
given development machine, or when new xTAG devices are released by
XMOS. Change directory to the scripts folder of your tools
installation and run the setup script:
$ sudo ./setup_xmos_devices.sh
Elevated privileges associated with the user account from which this command is run will be required. Reconnect any currently connected xTAG devices for the changes to be applied.
To check that the xTAG devices are available and accessible run the following script in the same directory:
$ ./check_xmos_devices.sh
As shown, this script should be run as the normal user, not root.
USB driver support is provided natively on OS X.
Check xTAG access#
Configure the environment. Connect a development board to your host machine via an xTAG adaptor as necessary. Ensure that the development board is powered.
Use xrun -l to list the devices available for debugging. The first
time you issue this command, it may take several seconds for the xTAG firmware
to be downloaded. An example of the expected result is:
$ xrun -l

Available XMOS Devices
----------------------

  ID    Name                    Adapter ID      Devices
  --    ----                    ----------      -------
  0     XMOS XTAG-3             wfF.G58J        XS3A[0]
If the ‘Devices’ column lists None, it means the xTAG itself cannot
gain access to the development board. Check that the development board itself
is powered, and that the XSYS/XSYS2 connection is well made.