Building the Application Firmware#
Introduction#
The XVF3800 comprises a specialised xcore.ai processor and a firmware executable. A set of firmware images is provided in the binary release package which are configured to run correctly on the XK-VOICE-SQ66 development kit. However, when using the XVF3800 in a product design it is normally necessary to modify the firmware to match the hardware and to configure a number of settings. This is achieved by modification of the configuration files supplied as source code and rebuilding the modified code to create a new firmware image.
Instructions on configuring the firmware is included in the Tuning the application section.
This section explains how to build the XVF3800 application from files in the source release package.
Prerequisites#
The XVF3800 source code can be build on Windows, macOS and Linux platforms.
Note
An active internet connection is required as part of the process as the build scripts download additional packages to configure the environment.
The XVF3800 build procedure requires that a set of 3rd Party software packages, listed below, are installed on a development computer before attempting to build firmware for the XVF3800.
Python3#
A standard installation of Python version 3.10 or higher should be present on the development computer. This is available by default on some platforms, but if required it can be installed from https://www.python.org/downloads/.
The pip3 package manager included in the standard python configuration is used to install some tools and python is required to run some setup and tuning tools.
XMOS tools#
XTC Tools 15.2.x : This is the XMOS toolchain which allows users to compile, link, deploy and debug applications on all XMOS processors.
The XTC Tools can be downloaded from https://www.xmos.com/software-tools/ and installed on a development computer following the instructions in the https://www.xmos.com/view/Tools-15-Documentation. XTC tools can run on Windows, macOS and Linux platforms.
Build Tools#
CMake >= version 3.21.0 : CMake is a build tool for managing application compilation.
The CMake tool package can be installed following the instructions for your specific OS platform at https://cmake.org/install/.
The recommended make tools depend on the development platform:
(Linux and macOS): GNU Make - Available through your system package manager.
Ninja (Windows): Ninja - Follow install instructions at https://ninja-build.org/ or on windows
install with winget by running the following commands in PowerShell:
# Install
winget install Ninja-build.ninja
# Reload user Path
$env:Path=[System.Environment]::GetEnvironmentVariable("Path","User")
XVF3800 Release Package#
The XVF3800 firmware is supplied in two different release packages which are distributed as ZIP archive files with the following contents:
Binary release - a set of pre-compiled images that will run on the XK-VOICE-SQ66 development kit
Source release - Source code and libraries to allow customisation of the XVF3800
This section describes how to use the second package.
Release packages for XVF3800 can be obtained from the XVF3800 developer page or from your XMOS representative.
Load the ZIP archive onto your development platform and expand the archive into a convenient directory. It contains the release notes and a TAR file. On Linux or macOS, expand the TAR file using:
tar -xvf xvf3800_source_[date]_[time].tar
where [date] is the build date in yymmdd format and [time] is the build time in hhmmss format.
On Windows, expand the TAR file using the 7-zip utility.
This utility is freely available in the Microsoft Store.
Open a file browser and navigate to the folder containing xvf3800_source_[date]_[time].tar.
Right click on this file.
If necessary, select ‘Show more options’.
Highlight ‘7-zip’ and select one of the ‘Extract’ options.
If necessary, press the ‘Close’ button upon completion.
The contents of the source release package are shown below:
.
├── CHANGELOG.rst    <- list of changes of current and past releases
├── LICENSE.rst      <- license file
├── precompiled      <- directory containing the precompiled libraries
├── README.md        <- readme file
└── sources          <- source files necessary to build XVF38xx applications
The user modifiable code is found in the sources/app_xvf3800 directory.
Standard Configurations#
The XVF3800 release package contains a set of standard build configurations that will suit the majority of use cases for the XVF3800 device. The table below lists the key configuration parameters.
Parameter |
Options |
Abbreviation |
Notes |
|---|---|---|---|
Device configuration
|
INT-Device
USB
|
-intdev
-ua
|
|
I2S LR clock rate
|
16000
48000
|
-lr16
-lr48
|
Select sampling rate for I2S interface; ignored for UA configurations.
|
USB IN/OUT sample rate
|
16000
48000
|
-io16
-io48
|
Only valid in UA configuration; ignored for INT configurations.
|
Microphone geometry
|
Linear
Square or circular
|
-lin
-sqr
|
Selects microphone configuration on XK-VOICE-SQ66 board
|
Control protocol
|
I2C
SPI
|
-i2c
-spi
|
Select control protocol for INT configurations; ignored for UA configurations, as they always use USB as control interface.
|
Audio MCLK
|
Use external MCLK signal
|
-extmclk
|
Only valid on INT-Device configuration. Should be omitted if an external MCLK is not used.
|
Image Names#
The XVF3800 built image names comprise the parameter abbreviations listed above in a set order:
<device config>-<sample rate>-<mic geometry>-<control protocol>[-extra-options]
where -<control protocol> is not set for UA, as it always uses USB, and -extra-options can be -extmclk, -io-exp and -spatial.
Examples:
-ua-io48-lin-ua-io16-sqr-intdev-lr48-lin-spi-extmclk
More information about the supported build configurations can be found in the tables Table 23 and Table 24.
Build Process#
Set up the environment#
Note
The software packages in the Prerequisites section must be installed before starting this process.
To build the XVF3800 application, open a command-line terminal and ensure that the XMOS tools are configured in the environment. This can be checked by typing:
xcc --version
which should display the tools version information. If this does not happen please consult
the Configuring the command-line environment section of https://www.xmos.com/software-tools/ at https://www.xmos.com/view/Tools-15-Documentation.
Configure the build system#
The build process comprises of two phases - the first phase sets up the build environment and downloads key components while the second phase builds a specific executable. Configuration is only required to be done once.
To set up the environment change directory to the sources directory of the release package
and install the required Python3 packages:
cd sources
pip3 install -r requirements_build.txt
Then configure the build. This step can take several minutes. The preset to use depends on the host computer.
# Windows
cmake --preset=rel_app_xvf3800_windows
# Not Windows
cmake --preset=rel_app_xvf3800
Note
On Windows the maximum file path length is 260 characters. If the build path exceeds this length, the build may fail. If a warning is displayed about the maximum full path, move the source code to a directory with a shorter path length.
When this is complete the XVF3800 build system has been configured.
Build an executable#
The next phase is to build a specific executable. The release package contains a set of configurations that cover the main use case for the XVF3800 device.
To see the available build presets use:
cmake --build --list-presets
The naming scheme for these presets is defined in the Standard Configurations section above.
Select the preset you wish and start the build.
For example to build a 16 kHz USB configuration with a square microphone array is:
cmake --build --preset=ua-io16-sqr
The script will compile all the source file and when it completes the generated binary
file is saved in the subdirectory build.
The required executable binary will be named application_xvf3800_ua-<build options>.xe.
As an example the result of the build command above would be:
build/application_xvf3800_ua-io16-sqr.xe.
Installing the Executable Image#
Two methods exist to install on the XVF3800 hardware the executable image created in the previous section,
using the xrun and xflash tools that are suppled in the XTC Tools suite.
Both methods require a connection between a development computer and the XVF3800 via an XTAG4 debug adapter. Instructions to set up the XK-VOICE-SQ66 development kit can be found in the Setting up the hardware section of this guide.
Install Using xrun#
The xrun tool loads the executable image into the XVF3800 RAM without storing it in the XVF3800 Flash ROM.
It then starts the operation of the XVF3800 using this executable image. Using the example from above the
required command is:
xrun application_xvf3800_intdev-lr16-sqr-i2c.xe
Install Using xflash#
The xflash tool stores the executable image in the XVF3800 Flash ROM.
A subsequent power-cycle loads the stored image into the XVF3800 RAM and starts its operation.
Using the same example from above the required command is:
xflash application_xvf3800_intdev-lr16-sqr-i2c.xe
Using SPI Boot#
Creating a SPI Boot File#
To use the built application_xvf3800_[..].xe executable generated from the above process
as a SPI boot image it is necessary to convert the .xe image into a .bin file that includes
a bootloader.
The files required to build this .bin image can be found in the sources/modules/fwk_xvf/modules/boot_spi_slave directory
of the source release package.
Warning
This procedure requires the XTC tools to be installed on a development computer. It cannot be run on the Raspberry Pi host.
To create a SPI boot image change into the sources directory:
cd sources/
and then generate the binary image using the following command:
python3 xvf_tools.py generate_image <path/to/application_xvf3800_[..].xe>
An SPI bootable file application_xvf3800_[..]_spi_boot.bin will be created
in the build subdirectory.
Using a SPI Boot File#
Safe SPI Booting#
The SPI boot process is documented in the XVF3800 datasheet. An example python script is provided in the source release package which uses a Raspberry Pi to transfer the image and boot the XVF3800 device on an XK-VOICE-SQ66 development kit.
Note
The Raspberry Pi must be setup as described in the setting up the hardware section for this script to operate correctly.
The python script can be found in sources/modules/fwk_xvf/modules/boot_spi_slave/scripts subdirectory.
This script and the _spi_boot.bin image generated using the procedure described
above should be copied onto the Raspberry Pi.
To boot the XVF3800 device the following command should be run from sources:
sudo python3 xvf_tools.py send_image_from_rpi <build/application_xvf3800_[..]_spi_boot.bin>
The example script will need to be modified, if this procedure is executed on other host systems.
Note
The Python script provided is designed to be simple and safe. It uses a conservative SPI clock (12.5 MHz) and large inter-block delays for all blocks.
Fast SPI booting#
The SPI boot process is capable of running significantly faster (a few hundred milliseconds typically) through use of an optimized boot process.
An example of a speed-optimized boot host utility can be found in the sources/modules/fwk_xvf/modules/boot_spi_slave/fast_send subdirectory.
The maximum SPI clock speed can be up to 50 MHz depending on the signal integrity of your hardware. It has also been found that the Python SPI library incurs a latency of a few milliseconds after each 4 kB block has been transferred.
The XVF3800 device boot process has constraints that mean it needs a minimum inter-block delay to be applied at specific points throughout the boot process.
By taking into account these constraints and using a C language utility a much improved boot time may be achieved. The boot process requires inter-block delays at two stages as can be seen in Fig. 32:
A PLL settling delay after the tile[0] second stage bootloader has been received following the first 4 kB block. This delay may be as low as 1 millisecond.
An inter-tile transfer delay after the tile[1] application image has been received and is sent from tile[0]. The block count for this will vary depending on the binary size. The delay value typically needs to be 5 ms but may be longer if the firmware has been modified or a significant amount of extra code has been added.
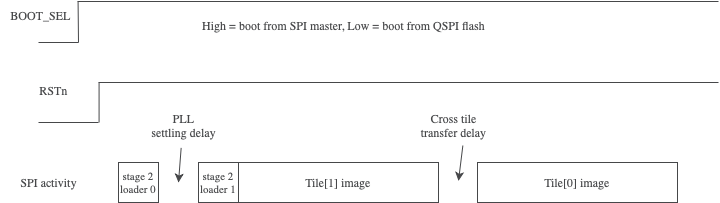
Fig. 32 Fast SPI boot time diagram#
To determine the inter-tile transfer delay block number, please inspect the output from generate_image.py.
For example, the following run indicates that the inter-tile transfer delay should be applied after the 103rd, 4 kB block has been sent:
--------------------------------------------

3384 loader object bytes (includes header but not ROM size word)
412780 image bytes
443944 image bytes
transfer_block_num: 103

--------------------------------------------
To build the fast SPI boot example for the Raspberry Pi do the following:
cd sources/modules/fwk_xvf/modules/boot_spi_slave/fast_send
make
To run the fast SPI boot utility pass the SPI boot image file, SPI clock speed and transfer_block_num to the binary. For example:
./send_image ../build/application_xvf3800_[..]_spi_boot.bin 50000000 103
The default firmware flashes the green LED on the XK-VOICE-SQ66 development kit to indicate successful boot. If boot was not successful first try reducing
the SPI clock speed and ensure that the transfer_block_num matches the generation stage output. To check the hardware is operational
you may also wish to try the Safe SPI Booting stage first.
Note
The Raspberry Pi 4 has a bug in the spidev driver where the output of the SPI perihperal is left in a non-working state after
a single boot. Running sudo rmmod spi_bcm2835 && sudo modprobe spi_bcm2835 after send_image has been found to work-around this.