Direct access to DSP Pipeline
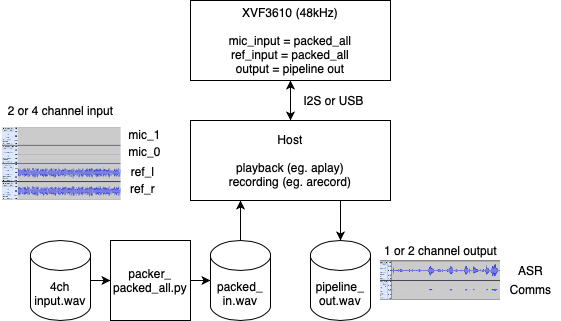
The XVF3610 supports a mode where the DSP pipeline can be fed directly from a 4-channel test vector which may either be pre-generated or even pre-captured by recording from an XVF3610 device. This can be helpful when re-creating a previous scenario or when tuning the system via the control interface in the presence of a fixed and repeatable test vector.
The vector injection mode works by packing 4-channel 16kHz input data (dual microphones and stereo reference) into a 48kHz stereo input signal. The device then unpacks the 48kHz wav into 16kHz multi-channel input and feeds it to the front end of the pipeline.
Example 1: Injecting a 4-channel, 16kHz test vector into the DSP pipeline
The goal here is to provide a 4-channel test vector directly into the DSP pipeline instead of using the mics and a separate reference signal. The packed input feature is supported by both I2S (INT) and USB (UA) connected XVF3610 variants however this example assumes USB as the host connection.

First, we ensure the resolution to 24b (default is 16b). We do not need to adjust the sample rate as this is set to 48kHz by default. The resolution is important because mic signals in a quiet room (35dBA) may be quantised away in a 16b audio sample. Also, the packing process uses the least significant bit of the audio to carry the frame markers and hence we lose 1b of audio resolution. Using 24b audio has been found to work on most popular hosts and OSs.
Second, we need to configure the audio crossbar switch to input PACKED_ALL_INPUT_USB on input channels MIC_TO_PIPELINE_0, MIC_TO_PIPELINE_1, REF_TO_PIPELINE_0 and REF_TO_PIPELINE_1.
We are going to make both of these settings by configuring parameters in a custom data partition. The audio crossbar can be configured at runtime whereas USB parameters can only be set in the data partition.
To create the custom data partition, we cd to the data-partition directory of the firmware. Next we make a copy of the default UA config file and modify it.
Now we need to add the “PACKED_ALL_INPUT_USB” commands in file input/set_packed_all_usb_pipeline_input.txt, the contents of which can be seen below.
SET_IO_MAP 4 17
SET_IO_MAP 5 17
SET_IO_MAP 6 17
SET_IO_MAP 7 17
Note
The IO map source 18 is set for both mic and reference channels. Source 18 automatically resolves the channel indices.
Next we replace the file item section of usb_adaptive_24b_packed_in.json with the following and save it:
"item_files": [
    {
        "path": "input/set_packed_all_usb_pipeline_input.txt",
        "comment": ""
    },
    {
        "path": "input/usb_to_device_bit_res_24.txt",
        "comment": ""
    }
]
Now we generate the data partition from our updated json file:
python3 xvf3610_data_partition_generator.py usb_adaptive_24b_packed_in.json
This will generate the new data partition file as follows: output/data_partition_usb_adaptive_24b_packed_in_factory_v<release_version>.bin.
Finally we cd up one level to root of the release package and flash the firmware along with the newly created data partition configuration file:
xflash --boot-partition-size 1048576 bin/app_xvf3610_usb_adaptive.xe --data data-partition/output/data_partition_usb_adaptive_24b_packed_in_factory_v<release_version>.bin
Once the firmware has booted following the flashing operation you may verify in the sound control panel that the USB stream from host to the XVF3610 is now set to 24b.
Next we need to convert the 4-channel audio test file we wish to inject into a packed, 48kHz, stereo audio file. Note that viewing/listening to the packed wav is non-sensical because it contains packed/multiplexed signals and will sound noisy. If you provide a 2-channel 16KHz input vector, the two channels are treated as microphone inputs and the reference channels are set to zero.
python3 ../python/packer_packed_all.py my_4ch_test_vector.wav packed_input.wav 24
The output file packed_input.wav can now be fed into the XVF3610. Do this with your favourite wav playback utility to inject the test file across the USB input to the XVF3610 device at 48kHz.
An example command to play the audio on a Linux host (with ALSA tools installed, assuming XVF3610 is device 1) is:
aplay -c 2 -f S24_LE -r 48000 packed_input.wav-D plughw:1
Note
Ensure the XVF3610 input audio device setting is set to 100% which will allow samples to be passed through without scaling or breaking the marker sequence. Do this in your OS Audio control panel; it is not a control supported by the vfctrl mechanism. If the device receives an invalid marker sequence it mutes the inputs.
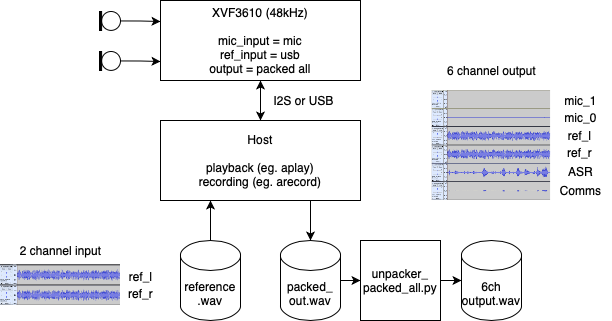
Example 2: Capturing all pipeline input and output signals over a 48kHz USB interface
 The goal here is to capture both the pipeline input and
output to provide debug visibility of the signals entering the DSP
pipeline and what processed output was generated. This can be helpful
when checking that the microphones are working and reference signals
are correctly routed, as well as debugging reference signal delay
issues which can cause poor AEC performance. It also allows capture
of a test vector which may be used at a later date to inject into an
XVF3610 system for testing and tuning.
First, we set the USB output interface resolution to 24b. This is important because mic signals in a quiet room (35dBA) may be quantised away in a 16b audio capture. Also, 24b audio has been found to work on most hosts whereas 32b can cause issues on Macs due to 24b internal representation.
Second, we need to configure the audio crossbar to output PACKED_ALL on USB output channels 0 and 1.
We are going to do this by setting the parameters in the data partition. To do this, we cd to the data-partition directory of the firmware. Next we make a copy of the default UA config file and later modify it.
cp ua.json ua_24b_packed_out.json
Now we add the “PACKED_ALL to USB” commands in file input/set_packed_all_usb_output.txt which has the following contents:
Note that the IO map source 16 is set for both USB output channels. Source 16 automatically resolves the channel indices so this will result in a stereo output containing a packed capture of all six discrete channels of interest.
SET_IO_MAP 0 16
SET_IO_MAP 1 16
Next we add the following sections to the ua_24b_packed_out.json file item section and save it:
"item_files": [
      {
          "path": "input/set_packed_all_usb_output.txt",
          "comment": ""
      },
      {
          "path": "input/device_to_usb_bit_res_24.txt",
          "comment": ""
      }
  ]
Now we generate the data partition from our updated json file:
python3 xvf3610_data_partition_generator.py ua_24b_packed_out.json
This will generate the new data partition file as follows:output/data_partition_usb_adaptive_24b_packed_out_factory_v<release_version>. bin
Finally we cd up one level to root of the release package and flash the firmware along with the newly created data partition configuration file:
xflash --boot-partition-size 1048576 bin/app_xvf3610_usb_adaptive.xe --data data-partition/output/data_partition_usb_adaptive_24b_packed_out_factory_v<release_version>.bin
Once the firmware has booted following the flashing operation you may verify in the sound control panel that the USB input stream from the XVF3610 to the host is now set to 24b.
Next we need to capture the packed output audio file. Do this with your favourite wav capture utility to capture the stereo output from the USB input from the XVF3610 device at 48kHz. Ensure you save the file as 32b Signed Integer which is needed for the next step.
An example command line for linux (with ALSA tools installed and XVF3610 is device 1):
arecord -c 2 -f S24_LE -r 48000 packed_capture.wav -D plughw:1
Note
Viewing/listening to the packed wav is non-sensical because it contains packed/multiplexed signals and will sound noisy.
Finally you can now convert the packed file into an unpacked, 16kHz, 6-Channel audio file.
python host/unpacker_packed_all.py packed_capture.wav unpacked_6ch_16kHz.wav 24
The output file unpacked_6ch_16kHz.wav may now be inspected. Note that the channel assignment is as follows:
Microphone Ch 1
Microphone Ch 0
Reference input Left
Reference input Right
Pipeline Output Ch 0 (nominally ASR)
Pipeline Output Ch 1 (nominally Comms)
Below is a visualisation of a six channel audio capture. Note the relatively quiet mic signals compared with the reference. This is typical and allows for loud near end signals without clipping.

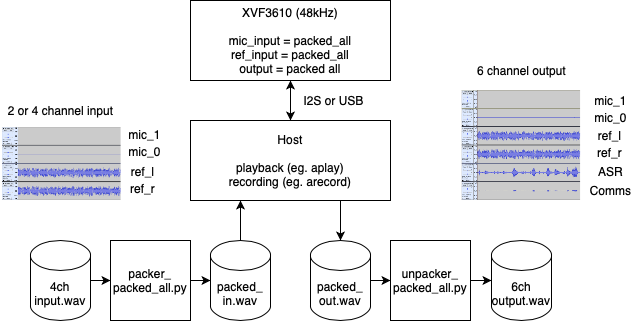
Example 3: Injecting a 4-channel packed input and capturing a 6-channel packed output
To enable 4-channel input and 6-channel output simultaneously, simply use the following json file which you might want to call ua_24b_packed_in_out.json. The item_files section should be filled in as below. The other steps to creating these are the same as described in examples 1 and 2.
The full packed-input, packed-output system looks like this:

This configuration is recommended for Hardware-In-Loop implementations because the integrity of the packing and unpacking process can easily be checked visually by inspecting the 6-channel output capture.
Notes on PACKED_ALL signals
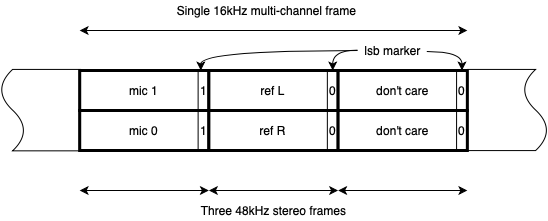
PACKED_ALL packs up to six 16kHz channels into a 48kHz stereo signal. When using USB (UA) firmware it uses the bit resolution of the USB output interface (even if you output to I2S on the UA device) and always assumes 32b it you are using I2S since the I2S interface uses a fixed 32b bit width. The packing sequence is as follows:
16kHz channel |
PACKED_ALL_INPUT |
PACKED_ALL output |
|---|---|---|
0 |
MIC 1 |
MIC 1 |
1 |
MIC 0 |
MIC 0 |
2 |
REF left |
REF left |
3 |
REF right |
REF right |
4 |
unused (ignored) |
ASR pipeline output |
5 |
unused (ignored) |
Comms pipeline output |

mic samples with marker ‘1’ in least significant bit
ref samples with marker ‘0’ in least significant bit
pipeline out sample with marker ‘0’ in least significant bit
The packer_packed_all.py script masks off the least significant bit and inserts the packing marker sequence, as well as changing the output format to 48kHz stereo. It can support 16, 24 or 32b resolution although 24b files are saved and read as 32b with 8b LSB padding.
The unpacker_packed_all.pyscript looks for 0, 0, 1 for the LS bit to check for a packed_all sequence, else it will report an error. It will try to recover from sequence errors if present. The packing will work with 16b, 24b and 32b sample bit widths although <=24b is recommended.
Notes for operations on Windows using Audacity
Using USB bit width of 24bits, record as WASAPI in audacity, as PCM audio Export as 32bit PCM wav
Ensure the 24bit marker argument is supplied to unpacker script