Installation Instructions
xTIMEcomposer and related drivers are provided in a single platform-specific downloadable file.
Install the tools
To install the tools on your PC, follow these steps:
On Windows:
- Download the Windows installer from:
- Double-click the installer to run it. Follow the on-screen prompts to install the tools on your PC.
On Mac:
- Download the Macintosh installer from:
- Double-click the downloaded installer to open it, and then drag the xTIMEcomposer icon
into your Applications folder.
The installer copies the files to your hard disk.
- Unmount the installer.
On Linux:
- Download the Linux archive from:
- Uncompress the archive to an installation directory, for example by entering
the following command:
tar -xzf archive.tgz -C /home/user
Install the USB drivers
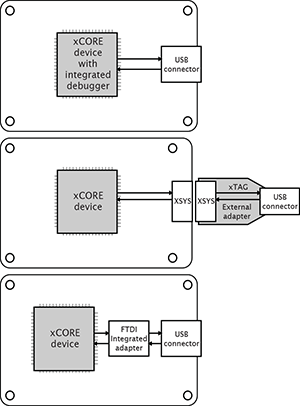
xTIMEcomposer interfaces to development boards over USB. Some boards provide a completely integrated debugger with the xCORE device, others require an external xTAG adapter that connects to the board via an XSYS connector, and some use integrated debug adapter on the board, as shown in the figure below.

Consult your board manual to determine which driver to use.
On Windows:
The JTAG drivers are installed by the tools installer. Plug your xCORE development board in after an installation to load the drivers.
On Mac:
USB driver support is provided natively on OS X.
On Linux:
USB driver support is provided natively on some versions of Linux. In some cases the driver must be enabled, see Enable USB drivers on Linux